Sabtu, 12 Maret 2016

Sneak Preview Of Current Project

This is what Im up to at the moment.  Seats and storage boxes for the rear deck.


More next time.

Read More..

Jumat, 11 Maret 2016

Fiberglassing


Once the boat looked all nice and shiny with perfect wood grain showing through the epoxy finish, it was time to mess it up...big time. So I fiberglass taped and epoxied the joints. I started with the keel joint and used 6" wide tape.
This tape was taped into place with some blue tape to hold it straight and overlapped the transom about an inch. The boat was already prepped for another coat of epoxy, so the fiberglass tape was epoxied and the whole boat got another coat of epoxy. After watching the Glen-L video on how to epoxy a boat, I followed their best practices of taping all joints before using the fiberglass cloth to cover all surfaces. The chine joints were taped and then the transom to bottom and sides were taped. Foam rollers were used to saturate the tape with epoxy. I found a 3" roller worked the best as quite a bit of rolling pressure is needed.

After trying some different epoxy filler to fair in the tape edges and finding sanding difficult, I went and bought some West Systems 407 fairing filler. Since the bottom will be painted, I got over the need to keep the wood pretty and figured I may as well use the right stuff for the application at hand. This filler is supposed to be mohoghany color, but it reminds me of chocolate milk. I slapped it in the areas needed to smooth out the tape transitions and sqeegeed it into a somewhat smooth surface. After curing, sanding with an orbital sander and 80 grit paper worked well and edges could be feathered and surfaces smoothed quite readily. At some point in this process, my wife came down and said "What the Hell?". I quickly explained "It all gets painted later". So it all looked like hell, but was smoother. I kept with just clear epoxy on the sides so I can keep the natural finish, but unthickened epoxy runs and sags like crazy (after you leave the room - just to be sneaky) so its a bit of work to scrape and sand them out.

Then I fiberglassed the transom as suggested in the video to get some practice and confidence. The cloth was cut and taped in place to overlap the bottom by 1-2" and trimmed to fit over the sides a like amount. Corners were smoothed into shape without cutting. Epoxy was rollered in and it all went smoothly. After cure, the edges were sanded down to feather in.

I then laid out the bottom fiberglass cloth on the bottom and trimmed to fit about an inch inside the chine line. My friend Ted said he kept all the cloth overlaps on the bottom of his boat and it simplified the feathering process, so I did mine the same way. I precut the cloth for the sides by splitting lengthwise some 38" wide cloth and rolled it up on shop vac pipes. My daughters boyfriend, Brett was here for an Easter weekend visit, and since he has fiberglassed a boat before, he was drafted into service. We mixed epoxy, rolled it on the bottom and smoothed out any wrinkles and bumps. Brett mixed more epoxy batches, I rolled, and it progressed quickly. We then pre-coated a side and rolled out and positioned the cloth to overlap the bottom 2-3" and trimmed the ends as needed. We rolled on some more epoxy and worked it into the cloth and then did the final side. My daughter Katy joined in and we had three rollers going. It took about 1 1/2 hours to complete the job. After curing for a few hours, the fiberglass hanging over the edges was trimmed with a utility knife. It felt good to have this major step behind me. Thanks Brett!
Read More..

Kamis, 10 Maret 2016

Keel Assembly

At some point during the blazing summer, the main keel timber twisted so much that if you looked aft down the timber, the left edge was about an inch off the cradle. I was in a sorry state of affairs for a couple of days after coming back from vacation and noticing this, but then just planed down the top surface of the timber so it was level again and proceeded with life as normal. This was the first in what I imagine will be a long line of oy vey occurrences in which I will need to remember that this is a boat, not a rocket ship.

After epoxying some of the deadwood and a fore knee to the main timber, I started looking around for ballast and floor bolts. I got really excited when I found a company selling galvanized timber bolts for cheap in Virginia and ordered a bunch from them. As an afterthought, I called back five minutes later and asked if the threads were cut or rolled. This is kind of a big deal because rolled threads would mean that Id have to drill a hole larger than the shaft of the bolt to get the thing through which means I would have little springs of water gurgling up through the keel into the hull. The very nice man who answered said that indeed they were rolled and cancelled my order for me. I ended up getting the bolts custom made by a company in Houston called Madden Bolt, and they did a fantastic job.

Here some of the keel chunks are glued together and I have the keel laid on its side to plane it down. I dont think Id drilled for the ballast and floor bolts yet. Note the curved thing in the foreground with all the clamps-- thats the deck beam mold.

Here the keel has been painted with copper naphthenate as a preservative, the ballast and floor bolts have been driven in, and some rebar is being zip-tied/wired to the ballast bolts to support the scrap metal that will be suspended in the concrete ballast.
Read More..

Rabu, 09 Maret 2016

Oak Everwhere

Yesterday I went to collect my oak order form DWs.  I have to say I am delighted with the production and the finish.  I decided to get them to finish the wood as they have the setup and its one less job for me.  Im glad I did, it looks great.

On paper the quantity didnt seem that much, I certainly didnt visualise just how much there would be.  So now I have oak trim everywhere.


Guess what Im going to busy doing over Christmas.  This is now the beginning of the end of the fit out.

Read More..

Senin, 07 Maret 2016

Boat Building Inspiration

Heres a picture of the homemade boat that inspired me to build my own. The plan for this boat is called "Mustang" from Science and Mechanics magazine from the early 1950s. To the left is another boat called the "Bluestreak" from the same magazine. I was given the opportunity to take these boats for a spin and had a blast taking these boats around the lake. They both have 15 hp OMC outboards and scoot along quite well.


My other inspiration for building a boat was having this Chrysler 9.9 that was my dads. It is a 1969 and he bought it new back in the day. He put it on a 14 Sea Nymph aluminum boat which was purchased from Northwestern Boat Co. He loved the motor as it started easily and replaced a 7.5hp Scott on a 12 Clyde wooden boat. The Scott never started easily and he was in no mood to fish after working himself into a lather trying to start the thing. He sold the aluminum boat in his retirement years but did not want to part with the motor. Now as you can imagine, having an outboard motor with no boat is not very useful. So it seemed buiding a small boat would be a perfect match for this baby. So I got started with the boat build. However, so far it appears that a remote hook-up for throttle, shift and steering may not have been offered for this motor and might be difficult be to cobble up.


The next photo is from around 1961 during a vacation. Im in the middle of the boat, my mom and sister Sue on the dock. My dad is at the tiller of his first outboard motor, a 5hp Johnson. I believe now from my recollection of this silver colored motor and comparing it to pictures of old Johnsons, that it is a 1942 or thereabouts. I recall that we rented the boat during our stay. There was a steep set of stairs leading down to the lake with a motorized platform that traveled up and down to bring people and luggage etc. up and down. Our cabin was half way down the hill. One of the pictures in the group had Ludington Lake written on the back, but I cant find it on a map. My dad later rued the day he sold the old Johnson. It always started easily, unlike the Low-profile Scott he bought to replace it.


This picture of a wooden runabout is from the same vacation. We got a ride on it and I remember loving the sound of the V8 exhaust burbling in the water and what a cool boat it was. It was used to deliver the mail to people living on the lake. After posting this picture, I clicked on it and could see that the flag on the front of the boat says "US Mail"....so my memory is correct.
Read More..

The Aim of this Blog

First post on a brand new blog, I guess that I should explain what I plan to do with it.

I have been an amateur boatbuilder most of my life, in one way or another. From building toy boats for myself from plywood tea boxes brought home from work by my mom, or carved from pieces of dead protea bushes scavenged on mountain walks, to canoes shaped from salvaged galvanised sheet steel, wood from peach boxes and pitch melted into the joints and nail holes. This eventually led me through designing and building my own plywood beach catamaran to building a 36ft sailboat designed by Ricus van de Stadt. This led further to me studying yacht design then designing and building a few dinghies, canoes and two more large sailboats of 34 and 38ft (The 38ft boat forms the background to this blog). Along the way I also designed many boats for other amateur or professional boatbuilders for various materials.

My first big boat project. A 36ft boat in my mid-20s.

Despite my status as a professional yacht designer, all of my boatbuilding escapades were as an amateur in the worst sense of the title. I built the big boats in my garden, working through extremes of hot, windy summers and cold, wet winters. I was always on a tight budget, skimping on the family budget to buy what was needed for the boat that was in progress at the time. My wife had to endure losing kitchen utensils that sometimes found their way to a more useful role in the workshop, finding epoxy chilling in the freezer if I needed to slow the cure or discovering welding rods drying in the oven. Even newly painted scale models were sometimes drying in the warm oven. I dont know how she put up with me but that is the much needed and loved tolerance of the wives of most amateur boatbuilders. I am lucky to have the support of my wife in these ventures and hope that you are as lucky too.

My most recent project, a 14ft high performance skiff.

All this has given me a large amount of experience and knowledge that I am always happy to share with anyone who can benefit from the info. It places me in a good position to help others to make the best decisions for whatever boatbuilding project they are considering or have in progress. I expect that most of the posts will be of my choosing but I will be open to readers sending me their boatbuilding questions or problems that are looking for answers.

I anticipate that I will post on it weekly but the frequency may change. Lets just see where it goes, I hope that you will join me in the experience.

Addendum: Due to limits on my own time available to work on this blog, I need to keep it to a basis that allows me to post about once a week. I cant allow it to turn into a forum type of blog, on a question and answer basis because that will become very demanding of my time and rapidly fail. I will endeavour to provide interesting and informative content that will be of value to you, the readers, on this basis. If you have any particular subjects that you would like me to cover, please send me an email and I will add it to my list of subjects. You can do that via the email link on my website at http://dixdesign.com/email.htm . Thanks for understanding.

To see my designs, please visit http://dixdesign.com/
Read More..

Jumat, 04 Maret 2016

Im Floored


After a bit of consulting with my aesthetic director, she decided the best looking flooring option was additional battens added between the existing ones. A piece of plywood added over the battens was not attractive and not adding battens made it unclear to anyone that would get in the boat whether to step on a batten or on the hull plywood.

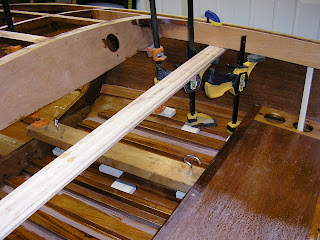
The 6 additional battens were cut and edges routered on the top side. Then with some pencil mark-ups on fitting to the floor, a stationary belt sander made quick work of getting them to fit to the floor. The creative use of clamps as spreaders and some other contraptions allowed the battens to be pushed tight to the floor while the thickened epoxy cured. I could only do 2 or 3 at a time due to limited number of clamps that could be made into spreaders. The floor looks a bit like flattened organ foot pedals without the black keys.

Read More..
 
Wooden Boat Plans - Powered By Blogger