Minggu, 04 Desember 2016

Navigation Lights

We are off in under 2 weeks eek!

Final preparations now for the continent include extra navigation lights.  Since the boat was built it has always had port and starboard lights (red & green)


Mine are like these

but the continentals are a bit more picky about navigation lights.  I did however in preparation put in the roof a socket to add a masthead light.


This is how a boat of Avalons size should be lit at night or poor visibility
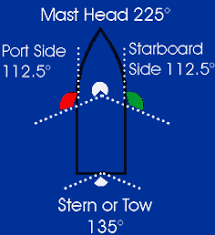


Because we dont expect to move much at night or in poor visibility the use of these lights will be limited, so I decided to make them easily removable.  They are attached with powerful magnetic mounts. 


 Masthead magmount

 Masthead light

 360 anchor light

Stern light (bolted down)

I have replacement LED bulbs on order for these new lights.

And the final prep is extra pins.  I could buy them but making them is far more me.  

I suggestion from my friend Graham (Contented Souls) about extra strong hold mooring pins, I have made these.


I have made a pair of these. These will act as 3 pins in one and each can have additional cross pins through the eyes. Of course in deployment they will be banged into the loop. 800mm each

Why?  Because there are some very big and fast commercial barges on the continental waterways of Europe.


Like this and bigger
Read More..

Selasa, 29 November 2016

Generator Update

The new drive plate has been made and fitted.


Once the drive plate and new support frame was fully bolted into place a final dial gauge test was done. On the end of the shaft there was 5/1000th of an inch runout. This shaft will be cut back on final assembly to about 11/4" (30mm) when the HRC90 coupling is fitted. This will reduce the runout even more. The coupling is designed to take way more runout than this.

This video explains better than I ever could how the taper lock system works.


Read More..

Sabtu, 26 November 2016

Getting on with things

Boat building has stalled in the last few weeks as I realize that the raising of each frame will bring the project one step closer to completion or calamity. At this point, Im not sure which it is going to be and am thus reveling in a rather blissful ignorance. When the frames do go up next week (!), I will know once and for all whether Luna will be a beauty or a god-awful mess. The quality of the lofting job I did over a year ago will be put to the test when I can use a batten to check the three-dimensional curvature of the chine and sheer.

The last couple of days have seen me drinking a lot of wine, eating a lot of tamales, avoiding the boat shop,and over-analyzing each step Ive taken to get to this point. For each part of the project there were setbacks and things that didnt turn out quite like Id imagined (these lessons have been mentally filed under "The Next Boat"). After spending a lot of time before each new step thinking about what could go wrong, I realized that the sooner I could deal with what went wrong, the better. Id stall before each new venture (just as Im stalling now), think about various outcomes and contingencies, and ultimately had to decide to just do it. Just take a chainsaw to that keel piece you spent a week in the hot sun laminating. Just run a Skillsaw down the side of  keel. Just buy that planking even if you arent sure itll wrap around the hull. Just use that adhesive even if its not proven. Just glue this piece on that piece and bolt it to this piece.

Just build the boat.


Read More..

Kamis, 24 November 2016

Bending the Shears

The first step to the shears was getting the length down to about 18" longer than what I measured to be required. Since the fit of the shear to the breasthook is a set angle, I cut some scrap material on my mitre saw until I got it right and then cut an angle on the front of each piece to mate with the breasthook. The four shear pieces (two layers each) were then soaked in the stairwell soaking tube for a couple of days.

I worked on the one side of the boat where I had the most room between the boat and the wall. To support the shear while bending into place, I clamped long boards to the form or the frames over to the wall, just below the level where the shears would meet the frames. This provided a resting place for the shear while bending into place. I then wrapped a bath towel around the shear along the area of the stem and another in the area between the front and middle frame. I then poured hot tap water over the towels (buckets underneath).

To start the bend into the breasthook, a 24" Bessy bar clamp was clamped to the shear to provide leverage and the leading end was bent while the remaining length of the shear pushed up against the wall about 3 away from the boat. After shoving it into place and the breasthook clamp board squezzed tight, the rest of the bending took place at the rear end of the boat. A pipe clamp was put on the shear near the transom and used to gradually bring the shear towards the boat. After pouring another pitcher of hot tap water on the towels, the shears were gradually moved into place up against the frames and clamped in place. Towels were removed and the shear left to dry. After a day of drying, the first shear was removed and moved to the other side of the boat where I did not have as much room to work. I repeated the process for the next two shear pieces. Unfortunately I did not take any pictures during this process.

While pulling the third shear piece into place, I heard a loud crack and looked up to see a distinct sharp angle forming inside the towel, just aft of the breasthook. Another crack or two later and several expletives, the break was complete. I backed off on the bending process because this shear was toast. I removed the towels, the clamps, and put the shear aside for later analysis. I grabbed the last shear piece out of the soaking tube and bent it into place without incident. Analysis of the broken shear showed a severe grain run-out in the area. I thought I selected all pieces to put the staightest grain towards the front of the boat, but I got this piece backwards. I decided to make a scarf cut in the broken area and mend this piece back together putting the scarf joint at the back of the boat. After the piece dried, I made a jig for my chop saw and made about a 5" long scarf joint in the shear and epoxied that sucker back together. After curing, joint clean-up, soaking and bending, I was back on track with all four shears bent.

Prior to gluing the first layer of shears to the frames, I made a mid bow area temporary "spreader board" to ensure the contour was similar on both sides. One side measured wider from centerline and the curve did not look as smooth as the other. The way my stem support was made, I had a level surface to center and mount this board. The first layer of shears was glued to the breasthook and frames using clamps to the temporary spreader to force the curve in place on the one side. Then the second layer was epoxied to the first layer and clamped into place. Screws were only used in the breasthook.

Read More..

Progress Again

I now have all the steering system hydraulics fitted.  Flow and return pipes have been run from the steering pump to the ram and with the help of my wife turing the wheel to order the system was filled and bled. Here is the helm pump.  I have removed the wheel again as its sure to get damaged.


I have also fitted the an external 13a socket, the 16a power inlet, 12v switch panel, locker doors and the red bit is the megga loud alarm sounder.

Sam the canopy maker came again today to start the final fit.  This has enabled me to finally get the big tempory cover off.  Whist it has done a stirling job the constant noise of it russtling in the wind has really irritted me. So..........


Before

And the big reveal...........


After

 Panoramic shot front

 Panoramic shot front

Sams Website  
I have a comment from an email corrispondent about the pram hood:-"The dogs Bollocks"  guess he didnt want to put it in the comments box. I aggree.  I will show it off on another blog later on as to what it does.

While Sam and indeed his daughter Sam were fitting  this I was bust up the front end.  I have removed the horible steel front doors and replaced them with the loverly oak ones I had made.


Before


After
The grind marks are to remove the hinge

Finally today another delivery of furnature to finish off the kitchen and for the bedroom.  Once again it feels like things are moving again.
Its strange how it goes, you seem to be working and nothing seems to get done, then in a couple of days all the prep comes together in a big way.

Sam is back on Friday to put the final fittings on the cover.

Read More..

Rabu, 23 November 2016

Stacking the Deck

The first step in the deck planking process was laying out the lines on the subdeck plywood so I could figure out what wood I needed to do the job. I drew in a 2" grid pattern on the sub-deck to ensure that the center planking would be symetrical. Using a batten, I drew in the perimeter cover board lines to follow the carlings aft of the dash and stay a "constant distance off the shear line" forward of the dash. I made the first line drawn on the forward deck (that I liked) the "master" and copied it to the other side. There is a slight difference in distance to the shear line from one side to the other, but not enough to worry about.


Then a trip to Armstong millworks to buy some African Mohoghany for the deck planking and then learn how to re-saw. The guys at Armstrong suggested that starting with 4/4 stock planed to as thick as possible (about .90") would be the best approach.


I started with laying out the boards along one side of the boat to determine joint locations to get a 12 long 10" wide board to cover the width and length. Due to the limitations of my shop, the board was cut into the pieces and angles necessary to go around the boat on one side, then each piece re-sawn to create the piece for the opposite side. With a riser kit previously installed on my bandsaw, a new 1/2" wide skip tooth blade, new Olsen "cool blocks" and a 6" tall fence, I started bandsawing the wood for the outer perimeter planking. The piece at the back of the boat was 9 3/4" wide and the re-saw went very, very, slowly, but it worked. Then a few trips through the thickness planer (new blades installed) yielded planks about .34" thick. Using countersunk screws, the first piece was located, beginning at the aft end of the boat and working forward, a joint line established, chop cut on the mitre saw, reinstalled and the next piece cut to fit up against the previous piece.
After the joints were established, the inside line location was transferred from the sub-deck to the underside of the cover boards. In the cockpit and motor opening area, tracing on the underside was straightforward. In other areas the grid pattern was used to re-create the line by tracing the inside edge of the boards onto the grid pattern and measuring to the line intersection at each grid line. Tedious, but it worked. Line was cut on the bandsaw about 1/32" proud and then sanded to the line with a small 1" stationary belt sander. Outer lines were traced, cut, and sanded in a similar manner.

The kingplank down the middle of the boat took a bit of trial and error to find a width that looked "right". I started at 6 1/2" wide, about an inch wider than the perimeter boards in the fore deck area and it seemed too dominant. At 5 1/2" it still seemed too wide, so eventually my aesthetic director concurred with a 4" wide being the "right" width.

The grid pattern helped with cyphering out the width of the longitudinal planks. Eventually settling on 1 7/8" width, and a 3/16" gap. In order to fully utilize the boards I had purchased and not have to go buy more wood, I needed to squeeze four planks from a board width of just under 7 3/4" inch. (Maybe the king plank should have been a bit wider!) This created an opportunity to buy a new tool for the shop - a micro-kerf table saw blade which only cuts a 1/16" wide kerf. After creating a new table saw zero-clearance insert with a splitter, I was all set to cut the planks. The new blade cut like butter and I got all the pieces needed to cover the deck.


The plan at the moment is to stain the perimeter and king planks a darker color to provide greater contrast. Then finish all the planks to seal all the grain and complete the deck using a white pigmented epoxy to fill the gaps.


Read More..

Lounge Furniture Ordered

After much deliberation the sofas have been ordered.  In the end war was averted.

 We have 2 of these on the way

Also ordered today is the TV unit.


I have been working on the water tank, my brother the stone mason came Monday to do the template for the kitchen worktops.  We are having Star Galaxy.

Easy to see how it gets its name

I have started building the bedroom furniture now, all the kitchen appliances are on order, the bow thruster is in but I am waiting for the cables to be made before I blog it.

So things are moving in many directions and I can definitely see the light at the end of the tunnel.  So much so I am now searching for moorings.


Read More..
 
Wooden Boat Plans - Powered By Blogger