Tampilkan postingan dengan label and. Tampilkan semua postingan

Jumat, 18 November 2016

Alarmed And Connected

I have now installed the alarm system.  Its a wireless setup which can take up to 16 sensors.  Currenlty I have 4 door break sensors and 4 passive PIR and a smoke detector.  The company is also devoloping a flood sensor which will be handy for the bilges and can be added to the system.


 This is the kit  As you can see it does a lot of clever stuff especially the GSM facilities.
Also installed is the 3G wireless router with exteral 9dBi aerial.  I hadnt planned on this when I put the lounge wall up.  I was rather chuffed with myself that I managed to find and dill into the 2" cavity from outside on the roof on the first attempt.  Once this was done it was simple a case of tracing the wire down.


See here for the full spec and Here for the aerial

Both of these devices will run directly from the 12v supply and draw a tiny amount of power.  The modem will only be on when we are at the boat, the alarm of course will be on all the time.  Standby draw is 0.5a
Read More..

Jumat, 11 November 2016

Fairing the Frames and Longitudinals


The process of beveling and smoothing all the surfaces that the plywood "skin" mates to is called fairing. It is inherently a bit confusing to the new boat builder as its hard to know where to start, what tools to use, and how much material to remove.


The picture shows the tools I ended up using from top to bottom in the picture: 1) power 3 1/4" hand planer, 2) small belt sander Porter-Cable 2 1/2"X 14", 3) 1" Stanley hand plane, 4) 8" Jack plane, 5) Rasp, 6) Disston Abrader, 7) Long sander (made from 1/4" scrap wood to fit a 3x21 belt from a belt sander).

After filing some notches at the frames to set the angle of the longitudinal pieces, the major wood removal starts to blend the shapes from one spot to the next along the longitudinal pieces. I found the power planer a bit aggressive and hard to see what was happening until after a pass was made. The hand planes turned out to be quite effective at removing material quickly on the curved surfaces. They were a pleasure to use since they are quiet and they allow the surface to be seen as you work which is reassuring . The small Porter-Cable power sander was a great tool as the vacuum pick-up removed the dust effectively and it was fairly easy to see what was being removed. It was great for putting the contour on the frames.


The bottom piece on the right side of this picture is called the shear. It has not been faired yet and is still a square section. The idea is to angle it so the outer surface points towards the member above it (the chine). The trick is that the angle is constantly changing and it turned out that my chine surface was not sufficiently angled to have a prayer of getting a piece of plywood to lay on it and the shear at the same time. So the chine had a couple more laminations of material added to get the bottom angled out enough to "point" towards the shear below it.

In this picture, the bottom piece (shear) is faired so that its surface points toward the chine above. This area of the boat probably took the most time as quite a bit of wood needed to be removed. You can see a lot of plane shavings and dust on the floor.
I think Im done with fairing, but it seems to be a task that could be done to infinity because with every new look it appears that a surface could be sweetened a little more. I think its good enough to move on and Ill fix something if I see the need as I prepare the plywood planking pieces.
Read More..

Jumat, 04 November 2016

Some Tips and Things Leaned along the way


Raising the bar: So far Ive been happy that I raised the form that the boat frames mount to. The plan says 24" off the floor, but I raised it to 32". With this small boat, I have not found it to be too high. The working level for the sides was good as I could sit on a stool for much of the work and it kept me off my knees. It is easy to get underneath the boat for various checks and bottom installation.


Recycled Ping-Pong Table: This has been a could base for mounting the forms while covering the carpet. Surrounded by 1/4" plywood, it does not move around and is a stable platform. If I had it to do over, I would add a 2x4 reinforcement from side to side directly underneath the form feet. It rocks slightly when pushed from the side as I only have a 2x4 reinforcement down the middle of the tables underneath where the 2x6 mounts down the middle. With the carpet and padding underneath the protective plywood, it flexes a bit underneath my feet and is very comfortable to stand on, unlike cement floors.


Gum Containers: I looked at an empty Eclipse gum container and being a pack rat it looked too good to throw out. So I asked myself, "Self, What could you use this for?" And the self answered, "Screws". They are terrific. The top unscrews for loading, the clear top allows seeing whats inside, it opens as a shaker spout for or the clear top pops open. Way cool. Im chewing alot of gum now trying to get enough containers for all the different screw sizes. Maybe they should advertise that!


Screw Lube: Sometimes screwing goes better with a little lube...get your mind back on track, were talking boats here. After breaking a couple of the silicon-brass screws, I started putting a small amount of "Screw-lube" on the tip and the problem went away.


Dry Wall Screws: I used these screws for the temporary screw blocks and while they may be cheap and drive home easily, but they also sometimes break when removed. I didnt learn my lesson and kept using them, and had another three break off when removing the screw blocks on the second front bottom piece.
Broken Screw Removal: When the cheap drywall screws are broken off at the surface with nothing to put a vice grip on, what do you do? They have to come out or they would rust later. After digging through my shop, I found a roll pin with an I.D. about the screw shaft diameter. I filed a short spiral so it would cut the wood around the screw shaft when rotated counter-clockwise. I chucked it up and started pushing and boring around the screw shaft. It would smoke and act like it wasnt going to work until with a bit more brute force it would grab the screw and out it would come. Drilling clockwise into scrap wood would remove the screw shaft so I could reuse it. I used it more than I would have liked.
Read More..

Sabtu, 24 September 2016

California Drought and Flood


This is yet another California drought post, this one featuring a book by two women who know what they are talking about, that is, the climate of California since the last ice age.
The idea behind studying the earths past climate is that we might be able to see patterns that could help us predict climate in the future.  Unfortunately, climate is capricious and the best that climate studies can do is to give us a smorgasbord of options.  Our options for California are periods of benign climate interspersed with droughts and floods.  California has been in a benign, wetter than usual period for about 150 years.  That period may now be ending.  The entire culture and economy of present day California has been built on top of the expectation that the past 150 years are whats normal for the climate of California.  Sure there isnt enough water in southern California to support large scale agriculture and cities, but with dams and aqueducts, water has been brought from elsewhere to make life in southern California possible.  Northern California fares a little better than the south but cities in Central California, like those that rim San Francisco bay have to import their water from out of the area.
The truth of the situation is that California does not have enough water to support a population of 39 million people indefinitely.  It has enough water if the climate is sufficiently wet.  But it isnt always.  There have been droughts that have lasted for 500 years, from AD 900 to AD 1400 for instance, much longer than California has existed as a state. The present culture of California could not exist in such a climate. Indian cultures have existed in all these varying climates but they were never as dense as the present population.  They were also not as settled and had a better sense of climate variability than the people who built the present day California.
For example, the Central Valley of California where some large part of the produce sold in the US is grown floods periodically.  The Indians tended not to build permanent settlements there.  They moved there when floods were not imminent and moved to higher ground when storms were likely.  The current culture on the other hand has built cities and farms in this flood plain that gets flooded in excess of ten feet every hundred years or so. The last great flood happened in 1862.  A flood of this magnitude happening today would destroy a good deal of housing and farms and also displace 6 million people.  It would also very likely drown much of the infrastructure that brings water to Los Angeles, San Francisco and other coastal cities.
So perhaps drought is not even the worst threat to California.  Drought is a threat to agriculture in California but then agriculture in California was never a good idea unless one is comfortable with the idea that it might only be a temporary arrangement.
Read More..

Rabu, 31 Agustus 2016

Leaf Blowers and Entropy

The other day, the gardeners were in our neighbors back yard and blowing away at the leaves.  As they usually do, they try to corral the leaves in one corner of the yard where they can then scoop them up and haul them off somewhere.  Unfortunately, when they blow them up against the fence that separates them from our yard, a good deal of the leaves and other debris ends up in our yard.  So yes, I am one of those people that thinks that leaf blowers are a bad idea.
But that is not my main point here.  My point is to talk about a definition of entropy that sees it as a degree of disorder.  In this view, entropy is created when the world becomes more disordered.  The gardener with the leaf blower lowers the entropy in his clients back yard but increases the overall entropy of the neighborhood by expending energy to create more order in a specific place at the cost of the larger environment.
This is how living organisms operate as well.  They hold entropy at bay internally by increasing overall entropy in their environment.  And it is only by holding entropy at bay by sucking energy out of their environment that living organisms can stay alive.
Still, it would be good if gardeners could work out a better way to remove leaves than by leafblowing and still put food on their table.
Read More..

Sabtu, 20 Agustus 2016

A frame goes up and an auspicious arthropod goes down

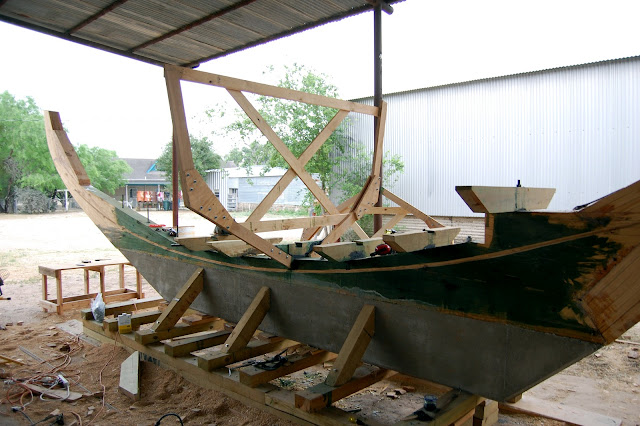
Frame 5 is the first to go up!
Floor 5 was situated about a quarter of an inch too far aft. One solution (and probably the proper solution) would be to replace the floor. I just shaved a quarter inch off of the timber real quick with a Skillsaw and chisel. Ramon was my hero in making it plumb with the plane when I got too frustrated to continue.

Treating bare wood with copper napthenate preservative.


And shes up! Three 3/8" bolts on each side. All wood-to-wood contact surfaces were soaked with copper and bedded in tar.


The "X" bracing and the cross beams at the sheer and just below the chine are temporary bracing.

Not the neatest job, but shes strong and deadly to fungi.

The first frame went up last night after a bit of a boat hiatus. Some coaxing with a Skillsaw and chisel got the frame to where it was supposed to hit the rabbet. Its nearly plumb, too. I apparently did a horrible job installing the floors, as three or four of them are not plumb nor flush with the station lines drawn on the keel. Ill be spending a lot of time over the next few days correcting my mistakes with a plane. This part of the boat building process has become tense as I anticipate bending a batten around the chine for the first time. I hope Luna will be beautiful.

Lucky for me, the universe sent me an auspicious sign this morning to calm my nerves.

I woke up at about 4 am this morning to a smelly, wet substance on my arm. I flung on the lights and, without my glasses, saw a blurry yellow puddle with a long, black swirly piece of business on my sheets where my arm had been. My mind immediately thought rats!, as I do have a history of sleeping in places were rats attack me in the night. Given this, and the series of rabies shots that followed, I am deathly afraid of rodents. I decided that, judging from the size of the mess on my bed, this rat had to be HUGE.  I frantically called Ramon to come over.

When I went back into my bedroom the turd was gone! I decided the rat must have come back and eaten it. I freaked. I had a monstrous, shit-eating rat in  my bedroom. I noticed a dark blurry mass moving slowly toward the corner of my bed. Rather than get closer, I decided to get out of there and start doing internet searches for, "feces consumption in rats," worried that there was a correlation between this behavior and rabies. Very productive.

When Ramon arrived, bleary-eyed and sweet as could be, we searched my bedroom with no luck. Ramon suggested the turd was in fact a culebrilla and that there was no rat. I was somewhat comforted by this possibility.

Culebrilla-- apparently common in the Valley, though sightings are rare.
But still-- the smelly yellow stuff made no sense. I resorted to Googling things like, "fat worm smelly yellow liquid" and finally came up with this:
A giant millipede! When stressed or injured, they secrete a pungent yellow substance that contains hydrogen cyanide. We never did find it, and these things live for 5-10 years. There was a lot of yellow stuff though, so one can hope it was fatally wounded. Ah well. Despite the long-lived monster spewing cyanide in my bedroom, I did sleep a little sounder knowing it wasnt a rat. 

The the silver lining in this early-morning fiasco? Apparently millipedes are good luck. Perhaps the chine will be fair after all.
Read More..

Sabtu, 06 Agustus 2016

One Lives And Learns!

I have to admit that despite doing all the calculations, in the real world the 240v electric combo microwave / oven just wasnt doing what it should have.

It did work from the engine alternators or the new 12v genset through the inverter but it was just not efficient and also an engine had to be running to use it so noisy too. So reluctantly I have had to admit          I was wrong.  I know I was told many times on the forums and had quizzical raise eyebrows from people I spoke to about it face to face.

So I now have a gas oven and full width grill and jolly well (and silently) it works too.


Once fitted I did a gas leak check with a digital manometer.  Start pressure was 39mb.  The supply was turned off and the pressure dropped to 30mb by turning on a gas ring.  It was left to settle for 5 minutes where it dropped 4mb.  After another 5 minutes the pressure had risen slightly to 28mb.  I left it another 20 minutes or so which is more than is required and the pressure remained at 28mb.  Test passed.


Read More..

Senin, 25 Juli 2016

Battens Cut and Fit


My battens have now been ripped and fit to the frames. I had to deepen the pre-cut notches to get the battens to lay flush with the frame contours. Per the "Boatbuilding with Plywood" book, battens should be installed after side planking, so I used some steel screws for temporary dry fit so they can be removed if in the way for subsequent work. They helped secure the frames in position so Ill leave them in place if possible.


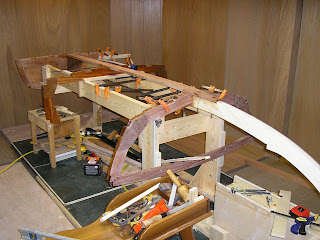
The sides of the middle frame were unsupported and could easily be pushed out of plumb so I added a temporary cross beam and some angle braces from it to the form to stablize them. Now they can be worked on without moving around.


The next step is fitting the chines. You can see in the photo that Im experimenting with a piece of pine to judge whether my notches are right. Im letting my buddy Ted forge ahead with his Zip and of course he just tried steaming his chines and installing and broke one. Im taking a vacation so the boat will be on hold for awhile. Maybe when I get back, Ted will tell me how to install a chine without making expensive mohogany firewood.
Read More..

Selasa, 05 Juli 2016

Strange Week

Its been a strange week since the last post. The passing of an era.

I have now sold our Narrowboat.  It needed to have a pre sale survey, unfortunately my marina could not accommodate us on the slip when we needed it but the next marina on the system were able to.  So I went down the marina last Sunday to save a rush on Monday morning.  The new owner turned up and we set of about 10am.  4 hours later we had covered the 12 miles to the other marina.  The boat underwent its survey and apart from some battery terminals that needed soldering and a small clip on a gas pipe all was good.  I stayed at the marina overnight and they soldered the terminals and I did the clip.  All work done I set off back the the home marina.  

 It was a sad journey for me tracked on my iPad

It was the last time I would be the owner of that boat at the tiller.  We have had it for 5 years and have enjoyed every minute if it.  Its been a great first boat and has been the springboard to this boat I am now building.  I hope the new owner has as many good times as we have had.

Leaving Stanground lock

Peterborough city 48 hour moorings

Midsummer Comon 48 hour mooring Cambridge

So having only a short week the priority was to get the rear ready for the cover.  The cover incoroprates a dodger which is the lower part which wraps round the bottom.  To make a neat and weatherproof job of it required a bottom rim to be made and welded in.  Once that was fitted next came the hard part of rubbing down the whole of the stern metawork then finally priming.

 The lower rim

This rim didnt follow the curve of the lower part of the boat so I had to make an infill fillet and weld it in just near the bollards.  The lower rim follows the upper rim.


I will give this a couple of days to harden right off before rubbing down ready for gloss coat. I have used 2 pac primer.  The spray gun I have has a very fine adjustment on it.  As 2 pac is a chemical cure paint the fine adjustment on the gun allows very fine placement of spray.  The primer is a high build filler/primer so the gun can be used to precisly fill any small areas which need building ready for rubbing down.

Read More..

Sabtu, 02 Juli 2016

That 25th Anniversary St Michaels Festival and its Vendors Artists Artisans

We have done a lot of shows over the years. Weve done a lot of kinds of shows over the years; art shows, carving shows, boat shows, various festivals, etc. They all have things that we like about them. Among the types of shows that we do are Antique & Classic Boat Shows (see our previous post). They are special to us, because the boats classified as "antique" and as "classic" can make for some very interesting subject matter for us.

Of these kinds of shows, weve gone from our homebase in Maryland to Virginia, Florida, New York, Michigan, Minnesota, California and other places. We do have a special place in our hearts for the one held right here in St. Michaels, Maryland. This is its 25th year; its "Silver Anniversary". It is known as the biggest antique and classic boat show in the Mid-Atlantic states.


Perhaps it is because the show is at home that makes it so appealing to us. Being a serious event in our home area we get to see the interplay between the show and the surrounding community, especially St. Michaels. If you dont know St. Michaels, its much more than a nice place to visit. Its also not a bad drive from Washington DC, Baltimore, Philadelphia, Wilmington, Annapolis, even New York. It has the Chesapeake Bay with its natural beauty, wildlife, scenery, historic places, museums, biking trails, boating, golf, etc., etc., etc.. It also has nice places to stay, great shopping and an ever growing selection of restaurants for a wide variety of palates (and budgets).


Certainly this is part of our favoritism for this show, but there is more. Every antique & classic show has special things about it. You can see certain differences related to the shows location. For example the famous Lake Dora, Florida show tends to have boats that are mainly under 30, because, for the most part, the boats come on trailers. They have a very large number of boats and they are from all parts of the U.S. and Canada. These tend to be "lake" boats, every one of them a great boat. Its held at a waterfront park with palm trees and Ibis.


The St. Michaels show also has a very large group of lake boats, but also many cruisers and motoryachts, because of its location on the Chesapeake, a body of water that supports ocean going and coastal vessels. Thus, there are boats from 8 to over 80 LOA. The environment at each show just has a different feel. St. Michaels has the feel of a coastal seaport.

...and the boats have a different feel...


Its held at The Chesapeake Bay Maritime Museum whose physical layout lends itself to this type of show with lots of grass for land displays and lots of docking space for the boats on display.


One of the things that I like best about the St. Michaels show is also its collection of vendors and artists. Antique & classic boats shows, if they have vendors, tend to draw high quality people with goods and services particularly suited to boaters and in some cases, specifically to those that love antique & classic boats. For example Jim Bassett is an engine expert and has original parts for older boats that are very difficult to find anymore. Since the boats are competing for best restoration to original condition, his parts, from step pads, to entire engines, could be the key to a great restoration. He also has things for boats of all eras and types and might have what you need to make your 1990s era boat work better.


We also have boat builders and restorers that have specific knowledge and abilities relating to older boats, especially wooden boats and their special requirements, including experience in the fine differences between a Century vs. a Garwood vs. a Trumpy Yacht. Among those experts are George Hazzard, Chad Brenner, Mast & Mallet, Will Ruhland, Jerry LeCompte, Dave Hannam and others. We have Chrome plating specialist Jim Wade and Rope specialist Jim Torbert.


We also have people that specialize in acquring original information, such as boat plans, catalogues and other documentation that help a boat restorer, amateur or professional to know the proper standards for the restoration to be done.

Then there are the Outboard specialists...


Basically, almost anything that you need for an older boat is available at this show. Most of these people also are specialists when it comes to modern boats, as well, and you will find that if you are a boater, most anything that you need is here at this show.


Another thing that I love about this show, and its great for anyone that wants to come to the show, but has fear that they are "dragging" someone else around, is "The Arts at Navy Point".


The Arts at Navy Point is basically something that occurred naturally in the shows development about 17 years ago, when the first vendors came. Among them were a good number of artists. Painter Grover Cantwell, who youll find in "the small boat building" was among them. We know because we were there, too and havent missed a show since.


There is a natural connection between the beauty of these boats and the arts. Bringing one of these boats back to its original condition really is an art. Since the time of the first vendors, artists have been in attendance in increasing numbers and we have literally had some of the best in the business over the years. This year we have a long list and it is not possible to include them all, but some of the names include Mary Lou Troutman, John Ritter, Russ Orme, Jim Kinnett, Rebecca Lowe, and many more...


There are also Artisans, those who are artists, but may build things, or practice artistry in whatever they do, including marlinespike artist Vince Brennan, or Wildlife Carver Bill Hickson or the many model makers, authors, furniture makers, and, again, too much to describe here.

I recommend that you go to http://intothings.com/boatshow/vendors.html to see a list of who is coming to this years show. Its very impressive!

Theres not much more to say except that this is one great way to spend Fathers Day. There is so much to see and do at the show, at The Chesapeake Bay Maritime Museum where its held and in St. Michaels that you wont be saying to yourself "Been there, done that"; Youll be saying "I cant wait until next year!"


Read More..

Minggu, 12 Juni 2016

Marking and Cutting the Rabbet

The rabbet is a groove cut into the side of the keel to accept the planking. I rough cut it using my Skillsaw and will chisel it out as needed. 


Read More..

Minggu, 22 Mei 2016

Aligning Frames and Laying the Keel


After the confirmation that this boat will make it out of the basement, I secured my frame pieces to the leveled form rails. After checking a hundred times if things were square to each other, I aligned the stem using a string and plumb bob method. I tried a laser but it was better at confirming the set-up than actually doing it.
I used steel carriage bolts for the dry run set up of the keel and transom knee. When I was satisfied with alignments I took the keel and transom knee apart and did the glue-up. When all was, glued, bolted and screwed in place I called it a day. The next day I sighted down the keel and saw hump between frame #1 (middle frame and frame #2 (front frame), which wasnt a real issue, but there was a dip between the transom and frame #1 which was a problem. The picture is sighting down the keel from the front and the flash didnt illuminate the keel after the middle frame. After sleeping on it, I decided to try and realign the transom a bit to straighten the keel forward of the transom.
I decided to shim frame #1 rearward about 1/16" and this gave me some room between the transom and form to re-align it. I pulled a 1/16" shim out to lower the transom, added one at the top of the form angle to the transom and this allowed clamping of the transom near the bottom of the form and I could dial out the dip in the keel with a twist of the clamps. So with the keel flat from transom forward to frame #1, I could move on.
Read More..
 
Wooden Boat Plans - Powered By Blogger